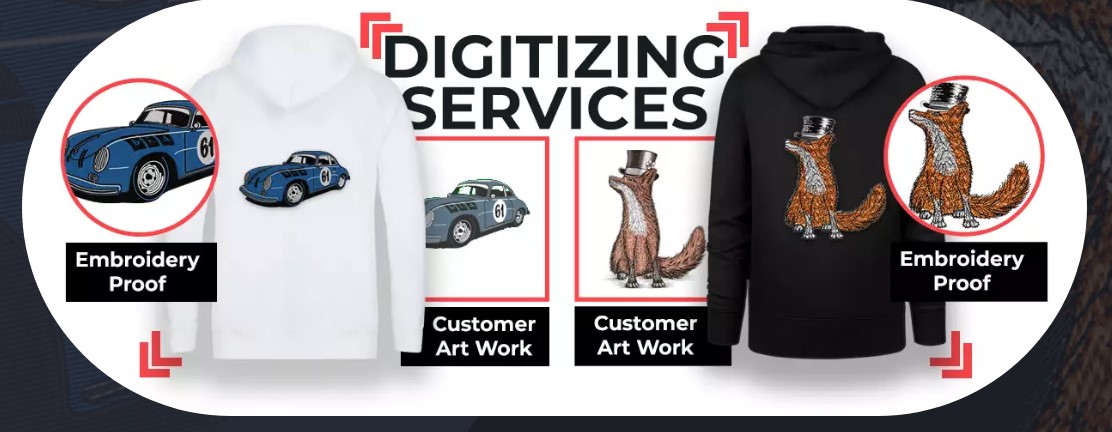
From Design to Thread: Convert Your Logo into Stunning Embroidery
Listing Description
Your brand deserves to be seen—boldly, clearly, and professionally. One of the most impactful ways to showcase your logo is through embroidery. Whether it’s on uniforms, hats, tote bags, or jackets, embroidered logos add a tactile, high-quality finish that grabs attention and builds trust. If you’re looking to turn your logo into a perfect stitch-ready design, Digitizing Buddy’s embroidery digitizing services is the place to start. They specialize in accurate, custom digitizing tailored for any project, offering fast turnaround and exceptional detail.
Let’s explore how you can go from a flat logo design to stunning embroidery results—thread by thread.
What is Embroidery Digitizing?
Embroidery digitizing is the process of convert logo to embroidery machine. It’s not just about uploading your image it involves skillful mapping of each stitch to match the contours, textures, and dimensions of your design.
This digital blueprint tells the machine:
- Where to stitch
- What type of stitches to use
- In what direction to stitch
- How dense the stitches should be
- The better the digitizing, the better the final embroidered result.
Why Turn Your Logo into Embroidery?
1. Professional Presentation
Stitched logos look premium. They add credibility to apparel, helping teams, employees, or brands look polished and unified.
2. Long-Lasting Results
Unlike printed designs, embroidery doesn’t peel or fade. It withstands washing, weather, and wear and tear—perfect for workwear and uniforms.
3. Versatile Application
You can stitch your logo on a variety of items, including:
- Hats and beanies
- T-shirts and polos
- Jackets and hoodies
- Bags and backpacks
- Towels and accessories
Step-by-Step: How to Convert Your Logo to Embroidery
Here’s how you go from concept to cloth:
Step 1: Submit Your Design
Start by uploading your logo in a high-resolution format (like PNG, AI, or SVG). Clean, bold designs with fewer gradients are best for embroidery.
Step 2: Digitizing the File
This is where pros like Digitizing Buddy come in. Their skilled digitizers manually recreate your logo using software like Wilcom, assigning stitch types, angles, and directions to each element.
Step 3: Choose Your File Format
Different machines require different file formats. The most common include:
PES – Brother, Baby Lock
DST – Tajima, Industrial
JEF – Janome
EXP – Melco, Bernina
HUS – Husqvarna
Make sure your digitizer knows which machine you’ll be using.
Step 4: Preview & Adjust
Before stitching your design, most digitizers run a test to ensure the logo sews correctly. Adjustments are made if any detail appears off.
Step 5: Stitch It Out
Once the stitch file is perfect, load it into your embroidery machine, hoop your fabric, and stitch your masterpiece.
Key Elements of a Great Embroidered Logo
Simplicity
Too many fine details or color gradients can become unclear in thread. Clean lines and bold shapes are ideal.
Right Sizing
Ensure your design is scalable to different items like caps (small) or jackets (large).
Color Selection
Use high-contrast thread colors to keep your logo visible and eye-catching.
Proper Stitch Density
Overly dense designs can cause thread breaks; too loose, and the logo looks patchy. Professional digitizers know the sweet spot.
Benefits of Using Professional Digitizing Services
Trying to digitize a logo with free or auto tools often leads to poor results.
A professional service like Digitizing Buddy offers:
Hand-digitized accuracy
Customization for different fabric types
Correct file formats for your machine
Free revisions and fast turnaround
Support for resizing and adjusting designs
They understand stitch behavior, machine requirements, and fabric dynamics—ensuring your logo doesn’t just “look” right, but sews perfectly every time.
Pro Tips Before You Digitize Your Logo
- Use Vector Formats – These are easiest to digitize and scale cleanly.
- Avoid Tiny Text – Anything under 0.25” tall may not sew well.
- Know Your Fabric – Thicker materials need different stitch techniques than thinner ones.
- Test Your File – Always test stitch your logo before mass production.
- Best Uses for Embroidered Logos
- Embroidery isn’t just for corporate branding. You can use digitized logos for:
- Team Uniforms – Sports clubs, schools, companies
- Event Merchandise – Giveaways, branded swag
- E-commerce Stores – Selling personalized items
- Startups and Creatives – Establishing a brand identity
Anywhere you want to make a statement, an embroidered logo adds style and substance.
Don’t Forget About Edits & Updates
Already have a logo digitized but want to:
- Resize it?
- Add or change colors?
- Convert to a different file format?
- Digitizing Buddy offers affordable revision services so your files stay current with your evolving brand or machinery.
Conclusion: Make Your Logo Embroidery-Ready
Turning your logo into a clean, beautifully stitched design opens up new branding possibilities. From staff uniforms to merchandise and everything in between, embroidery gives your brand a tactile, visual punch that print can’t match.
Professional digitizing is the key to embroidery success. Skip the auto tools and trust experts like Digitizing Buddy who understand the art and science of converting logos into stunning stitch files.
Gallery
Similar Listing
Abhishek Traders: The Best Sherwani Shop in Lucknow